Tuesday, February 4, 2020

Dollhouse Remodel


After
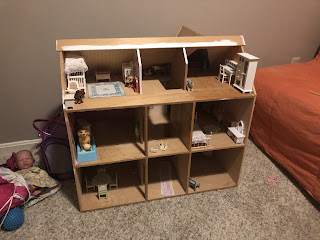
Before


In August of 2018
my daughter was given a dollhouse that had been started, but never finished. I thought "Cool! This can be a homeschool project for the two of us!" Just like it is a lot of time, time just got away from us and the dollhouse sat in her room, played with lots but never finished. So finally in January of 2020 I decided it was time!


We started off with white paint and covered the outside and the inside walls. Originally we started painting the floors but then decided since we were covering them they didn't need to be painted.


It is AMAZING what some white paint can do!
Since dollhouse flooring is so expensive we went another route for the flooring.
I decided to use contact paper for the flooring, a lot cheaper than dollhouse flooring.
You can find it here on Amazon

Just those two change made it look so different!

I picked up some coordinating scrapbook paper from Hobby Lobby and let the little lady pick the ones she liked for two rooms and we mod podged them on the walls.


I added more shingles and that left putting the window frames and shutters on the house. She was adamant that she wanted gold shutters for the outside, I tried to convince her of another color but she was persistent and I have to admit the gold turned out wonderful.

I also went to Lowes and had a precut piece of plywood cut a little smaller to screw the dollhouse onto and attached these wheels to the plywood so it could be rolled in and out of her closet.


We didn't have a frame for that triangle window and I couldn't find one so I improvised, a stained glass window! Vellum paper from Hobby Lobby did the job! I also picked up some moss mats while at Hobby Lobby. Its moss on sticky sheets and just cut it to size to make a front yard. We also had to do a little cutting at the bottom right window frame to get the opening wide enough for the frame. Last step was to attach the stairs to the inside and she's done!


This was such a fun little project for the two of us and she even has more ideas for it! Imagine a piece of plywood attached to the side with hinges and a eye hook so it can be folded up. On that plywood she wants to create a backyard for the dolls with a pool include! 


Monday, February 3, 2020

How to ship through PayPal & the supplies you'll need

So in my last post I showed you how to invoice through PayPal. In this post I am going to show you how to ship through PayPal.

Shipping through PayPal is cheaper than at the post office and your mailman can come pick it up from you!

A few of the supples you'll need!

  • A computer or device to air print from.
  • A printer, some people use label printers, I don't because my kids like to use my printing paper and I also print other items, I find it easier to use a regular printer. 
  • Printing Paper
  • Polymailers These are what I use....click here a 10x13 will work for most items but for those large items I use these...click here
  • For priority mail you can order supples for free straight from usps.com or pick them up at your post office. My usual items for priority are Padded Flat Rate Mailers and Medium Flat Rate boxes.
  • A scale, shipping or kitchen scale will work, here is what I use...click here
  • Shipping Tape.

Now let walk you through how to ship, If you are one that would rather watch a video here is a link to the video on my channel. How to ship using PayPal, I also walk you through scheduling a pick up with USPS.

1. Start off by logging into your PayPal. You will see recent activity, click that arrow. Anything that has been paid and is ready to ship will show a button that says "Print Shipping Label". Go ahead and click that. 

2. That will bring you to this page, if your package is under 16oz you will ship first class otherwise you'll have to ship priority. Go ahead and select "First Class" in the drop down menu and enter the weight.

 3. Super easy right! Now click "calculate shipping cost" that will give you the price. Then click "print shipping label".

4. That will then bring you to your label. Go ahead and click print, now your done! PayPal will automatically send the buyer a tracking number!

If you have and question or comments please don't hesitate to ask!


How to invoice through PayPal

A question I get a lot is where do you sell? When I give them the answer... 99% of my sales come from Facebook resell pages. The next question usually is, how do you get paid? I use PayPal, if you send invoices or a money request you pay a fee, but you are also protected by them. Which has come in handy.

So in this post I'm going to walk you through how to send a invoice using PayPal via mobile device and desktop.

To watch the YouTube tutorial: https://youtu.be/NzAJ6PT3nlY
Thrift Shopping and HomeSchooling
Invoicing with Paypal

Mobile

It is best to send an invoice via PayPal business app but can also be done via your phones mobile browser. 


Click “Create New Invoice” or the lightning bolt. 


Bill to: Insert the buyers email address

Add item or service: click and insert item info and price. 

Shipping & handling: Insert how much you are charging for shipping. 

Save then next. 


Send invoice or share invoice: click send invoice to automatically send it. Click share invoice to copy a link to your clipboard to send in a private message. 
Invoice via desktop browser

Log into your PayPal account. 


Send & request: click send & request

Next: Click more. 

Next: Click “Create an Invoice”


Next: Click “Create Invoice”

Next: Fill in “Bill to” with the buyers email address, “Description” fill in the info about the item and the price, “Shipping” fill in the shipping price if there is one. Then click “Send”. 


If you wish to share the link to the invoice you can click the arrow next to send and copy the link. 


Meet the writer, Katie

Hello! Welcome to Thrift Shopping and Homeschooling!

I've been a mom for 9 years, a thrifter/reseller for 7 years, and a homeschooling mom for 5 years.

My reselling journey began 7 years ago when my then almost 2 year old daughter was outgrowing her clothes that I didn't want to keep and I was pregnant with our first son. I started selling and buying here and there for both kids but the true adventure didn't begin until we moved to Maryland in the summer of 2015. Like most people when they move to a new location they go out exploring and that is what I did. I discovered a new to me store named, 2nd Ave Value Store. Once I realized it wasn't another Dollar Tree type store and it was a thrift store I began to love it. I would find modest jean skirt for girls or cute shoes that wouldn't work for my kids, but I knew of a group on Facebook where I might be able to sell them. One of the first things I remember selling were a pair of Naartjie girls boots, they were so cute but they wouldn't fit my daughter! From there I would venture out on 2nd Avenues sale days and see what treasures I could find. Now almost 5 years later this has become a part time job that God has blessed me with and all the glory goes to him!

Now the Homeschooling mom part, well that was all God too. When we moved to Maryland our oldest was 4 and getting ready for preschool. Before we felt to move to Maryland I had everything planned out, she would go to school where I went to from K4-12th grade. Obviously God had different plans. While on the search for a school for her to go to we just knew public school wasn't a option for us, private schools were to expensive so that left homeschooling. Side note: I always said I would never homeschool, I also said I would never move to Maryland. God has a way of always challenging you! 5 years later here we are, some days feeling like we rock this homeschooling stuff, other days feeling like we are in over our heads, but one day at a time we keep moving forward!